Workflows
The Workflow Process: Updating and Publishing Your Site
Workflow is the process that determines which pages you can edit, who needs to review your content before it's published, and who can publish pages directly.
The PCC Workflow Process is as follows:
- Level 2 Contributor(s) make content edits.
- When a Level 2 Contributor is complete with edits, they send the page to their assigned
approver (a Level 3 Contributor or a Level 0 Reviewer).*
*Note: If there is no Level 3 or Level 0 for an area, then the Level 2 Contributor’s assigned approver will be Strategic Communications & Marketing). - The Approver (either Level 3 Contributor or Level 0 Reviewer) reviews the page. If the page is deemed “not ready” for publish, the page is sent back to the original Level 2 Contributor with feedback on necessary changes.
- If the page is deemed “ready” for publish, the Level 3 Contributor will send the page
to Strategic Communications and Marketing for publish.*
Note: If there is no Level 3 Contributor for an area, then Strategic Communications & Marketing will automatically publish when the page is deemed ready.
The Workflow Screen
The Workflow Screen shows content that you have submitted to another user for approval or received from another user. Additionally, it shows content that has passed through or completed a workflow process (such as when content was approved and published, the request was declined, or canceled).
Access Your Workflow Screen
To Access your Workflow:
- Login to Modern Campus CMS
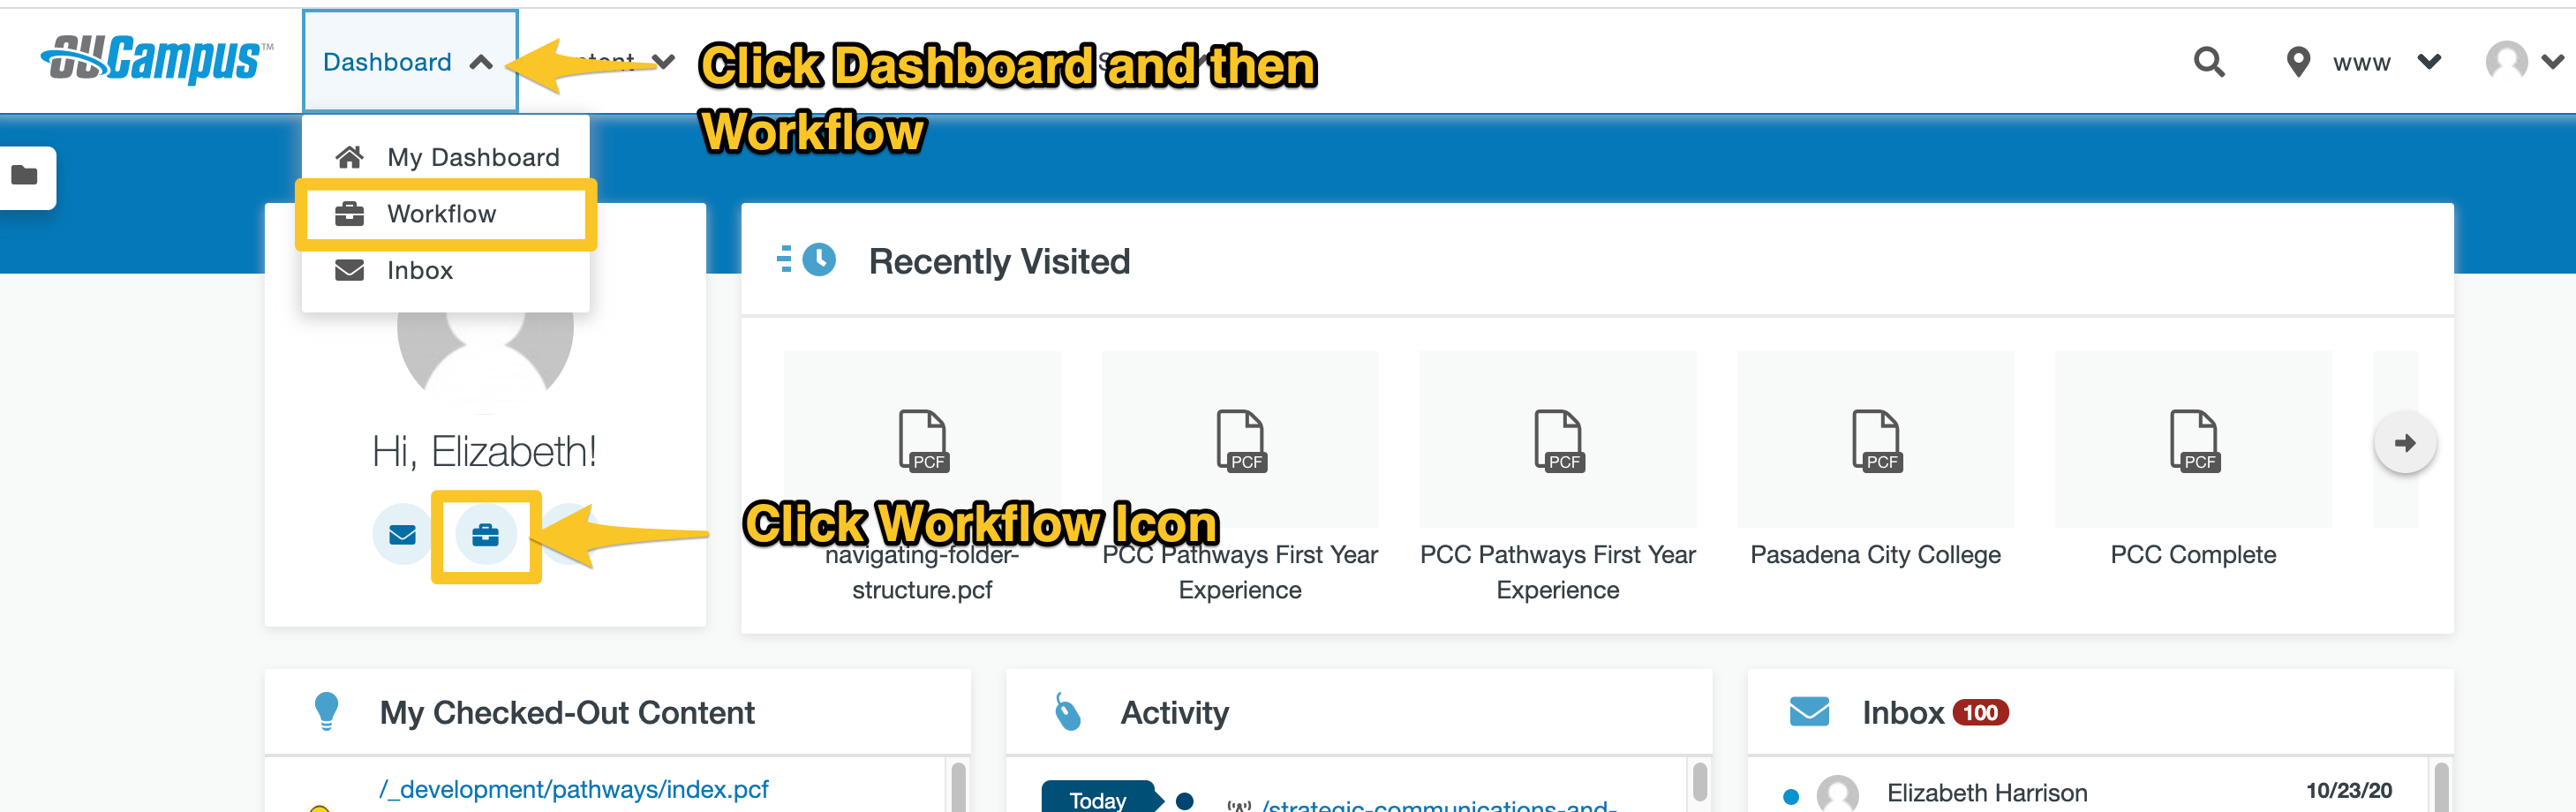
- Once logged in, hover over Dashboard in the blue global navigation bar
- Click on Workflow from the drop-down menu.
- Workflow can also be found by clicking the Workflow icon under your name on the Dashboard Page.
Access Workflows from the dashboard menu or the dashboard screen
Using the Workflow Screen
Once you have arrived at the Workflow Screen, you can use it to manage and track the content you have sent for review through the approval process.
The Workflow Screen lists all the activities associated with a specific file (i.e. each item is not an individual message). For example, if you have sent your “Contact” page for review, it will be listed one time in your workflow screen.
The Workflow Screen shows the following columns, each serving a different function:
1. From: This shows who the Workflow Request is from
2. Approver: This shows who the approver for the request is
3. File: This lists the file name of the content that the request is for. This is also a link, which you can click on to view a preview of the page and content updates
4. Status: The Status column shows an icon which signifies the current status of the file. You can hover your mouse over the icon to see a description of what the icon means. Or, you can click on the icon to see the workflow information associated with a file.
![]()
5. Date/Options: This shows the date and time of the most recent update. Additionally, when you hover over the date and time, a “View” link will appear. Click on the view link to see the workflow information associated with a file.
Workflow Messages
Workflow Messages are for content contributors to be able to discuss content edits on a specific file. Workflow Messages can be sent between a Level 2 Content Contributor(s) assigned to a file, the Level 3 Contributor assigned to approve the file, and the Strategic Communications and Marketing Web Content Publisher assigned to publish the page.
The Workflow Messages are all stored in the “Workflow Information” which can be accessed by clicking “View” from the Workflow Screen.
Workflow Messages are sent in the following ways:
-
Submit for Approval: When you submit a page for approval, you will be required to submit a message along with it. This message will be sent to your approver as well as be added to the Workflow Screen.
- Decline/Approve Submission: If you are an approver, you can either approve the updates and submit for publish
or decline the updates and send them back to the content contributor.
- If you choose to decline it, another Workflow Message will be created. This will be added to the other messages attached to that file as well as sent to the Content Contributor who submitted the file.
- If you choose to approve the changes and submit for publish, an additional Workflow Message will be created. This will
be added to the other messages attached to the file as well as sent to SCAM Web Content
Publisher.
- Additional Messages: At any time you can create additional messages related to that workflow item by clicking on “View” in the Workflow Screen. This will take you to the workflow information associated with that file. You can write a new message in the text field at the top of the messages section.
Workflow Archive
Once a workflow item has been resolved, it may be archived in one of the following ways:
- Hovering over the file row and clicking “Archive”
- Clicking "Archive" in the Workflow Message view
- Selecting the checkbox next to the item or multiple items and clicking "Archive"
Items are archived on a per-user basis. For example, if Anna and Bob are both part of a workflow message, and Anna archives it once the page has been published, Bob will still be able to see the item in his own workflow.
Next Up: 3.4 - Modern Campus CMS Messaging